Lexacom 3 integrates with the SystmOne clinical system, allowing users to import the patient name of their current patient into the Lexacom reference field. A new SystmOne API has been released, changing the way Lexacom can communicate with SystmOne. If you are a new or existing Lexacom customer, and you also use SystmOne, this guide will show you the steps that need to be taken to get up and running. Note that the new integration will only work with Lexacom version 3.14.8 or greater.
Before starting this guide, SystmOne should be opened before running Lexacom.
Setting Up the Integration
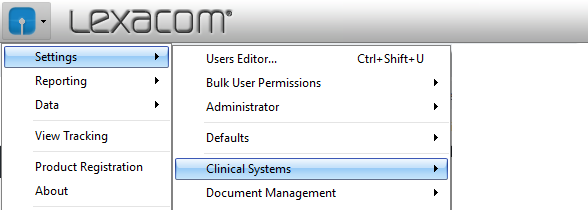
Step 1: Create Clinical System in Lexacom Admin
If SystmOne has never been used at your site, the following step will need to be completed before attempting to connect to SystemOne in Lexacom. If this has already been completed at your site, and you’ve been updated to the new API, you can jump directly to step 2.
In Lexacom 3 Admin, create the SystmOne clinical system under Settings > Clinical Systems > Add or Edit
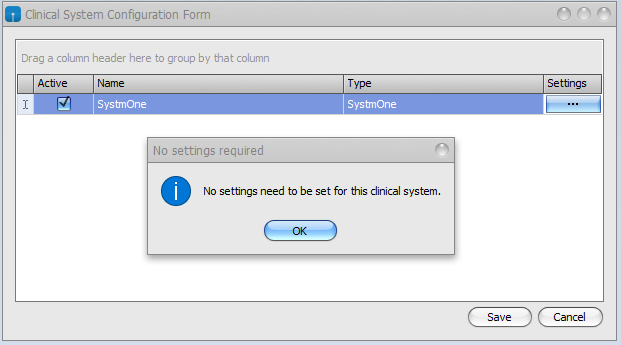
There are no additional settings required:
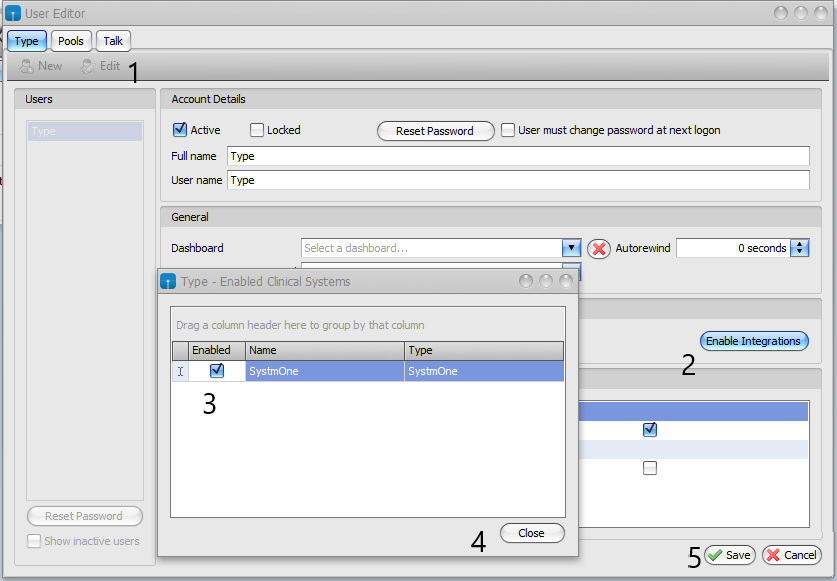
Users should be assigned the SystmOne clinical system through Manage Users or the Users Editor functions:
Step 2: Trigger Integration in Lexacom Client
Log in to SystmOne followed by Lexacom Talk
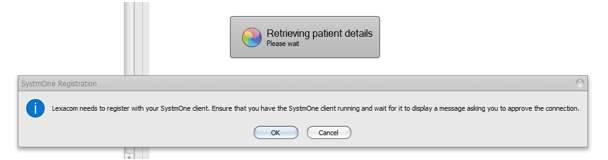
In the Lexacom 3 client, trigger the integration with SystmOne (e.g. by clicking the Import button within Lexacom 3 Talk):
If this is the first time registration has been attempted on the PC, the SystmOne registration message will appear:
This may appear under the Retrieving Patient Details loader, but this should not prevent clicking in the box:
Confirm that SystmOne is running and unlocked, then click OK to this message
Step 3: Create and Name ‘Device’ in SystmOne
SystmOne will then display a security message, with three options:
Click Approveto this message
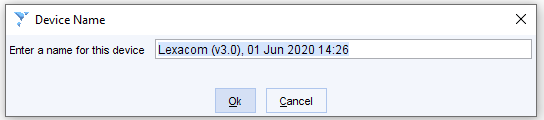
A prompt will appear to enter a ‘Device’ Name. This can be left as default or you may want to add in your machine name or number, click OK
Integration is now complete and you will be able to retrieve patient details.
Management of the Integration
Device Manager
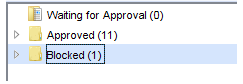
The integration with SystmOne is managed Setup > Mobile Working & Integration > Device Manager
This page will show pending, approved, and blocked connections to SystmOne:
Unblocking Lexacom 3
In case Lexacom has been accidentally blocked, it may be unblocked through the Device Manger in SystmOne
Go to Setup > Mobile Working & Integration > Device Manager
Expand Blocked
Right click on the Lexacom 3 device
Click Approve Device:
When prompted, click OK
Lexacom should then be unblocked.
DeviceID and the SystmOne.cfg
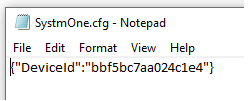
The new integration will create a configuration file (SystmOne.cfg) with the Device ID for Lexacom 3 from SystmOne
The DeviceId is randomly generated and will be particular to the ‘device’ created in SystmOne – each PC will have its own DeviceId
This config file is located in C:\ProgramData\Aprobrium\Lexacom3
There should be no need to modify or edit this file, though if this file is not present Lexacom will attempt to register with SystmOne again as a new device. This may result in multiple entries for Lexacom within SystmOne
An example of the contents of this file:
This DeviceId may be found in the Device Manager section in SystmOne:
Deleting Lexacom 3 from SystmOne
If a site wishes to remove the integration with Lexacom 3, the device may be removed from SystmOne:
Go to Setup > Mobile Working & Integration > Device Manager
Expand Allowed
Right-click on the Lexacom 3 device
Click Delete Device
When prompted, click OK
Lexacom 3 will still be able to establish a new connection with SystmOne in the future